Sunday, December 27, 2020

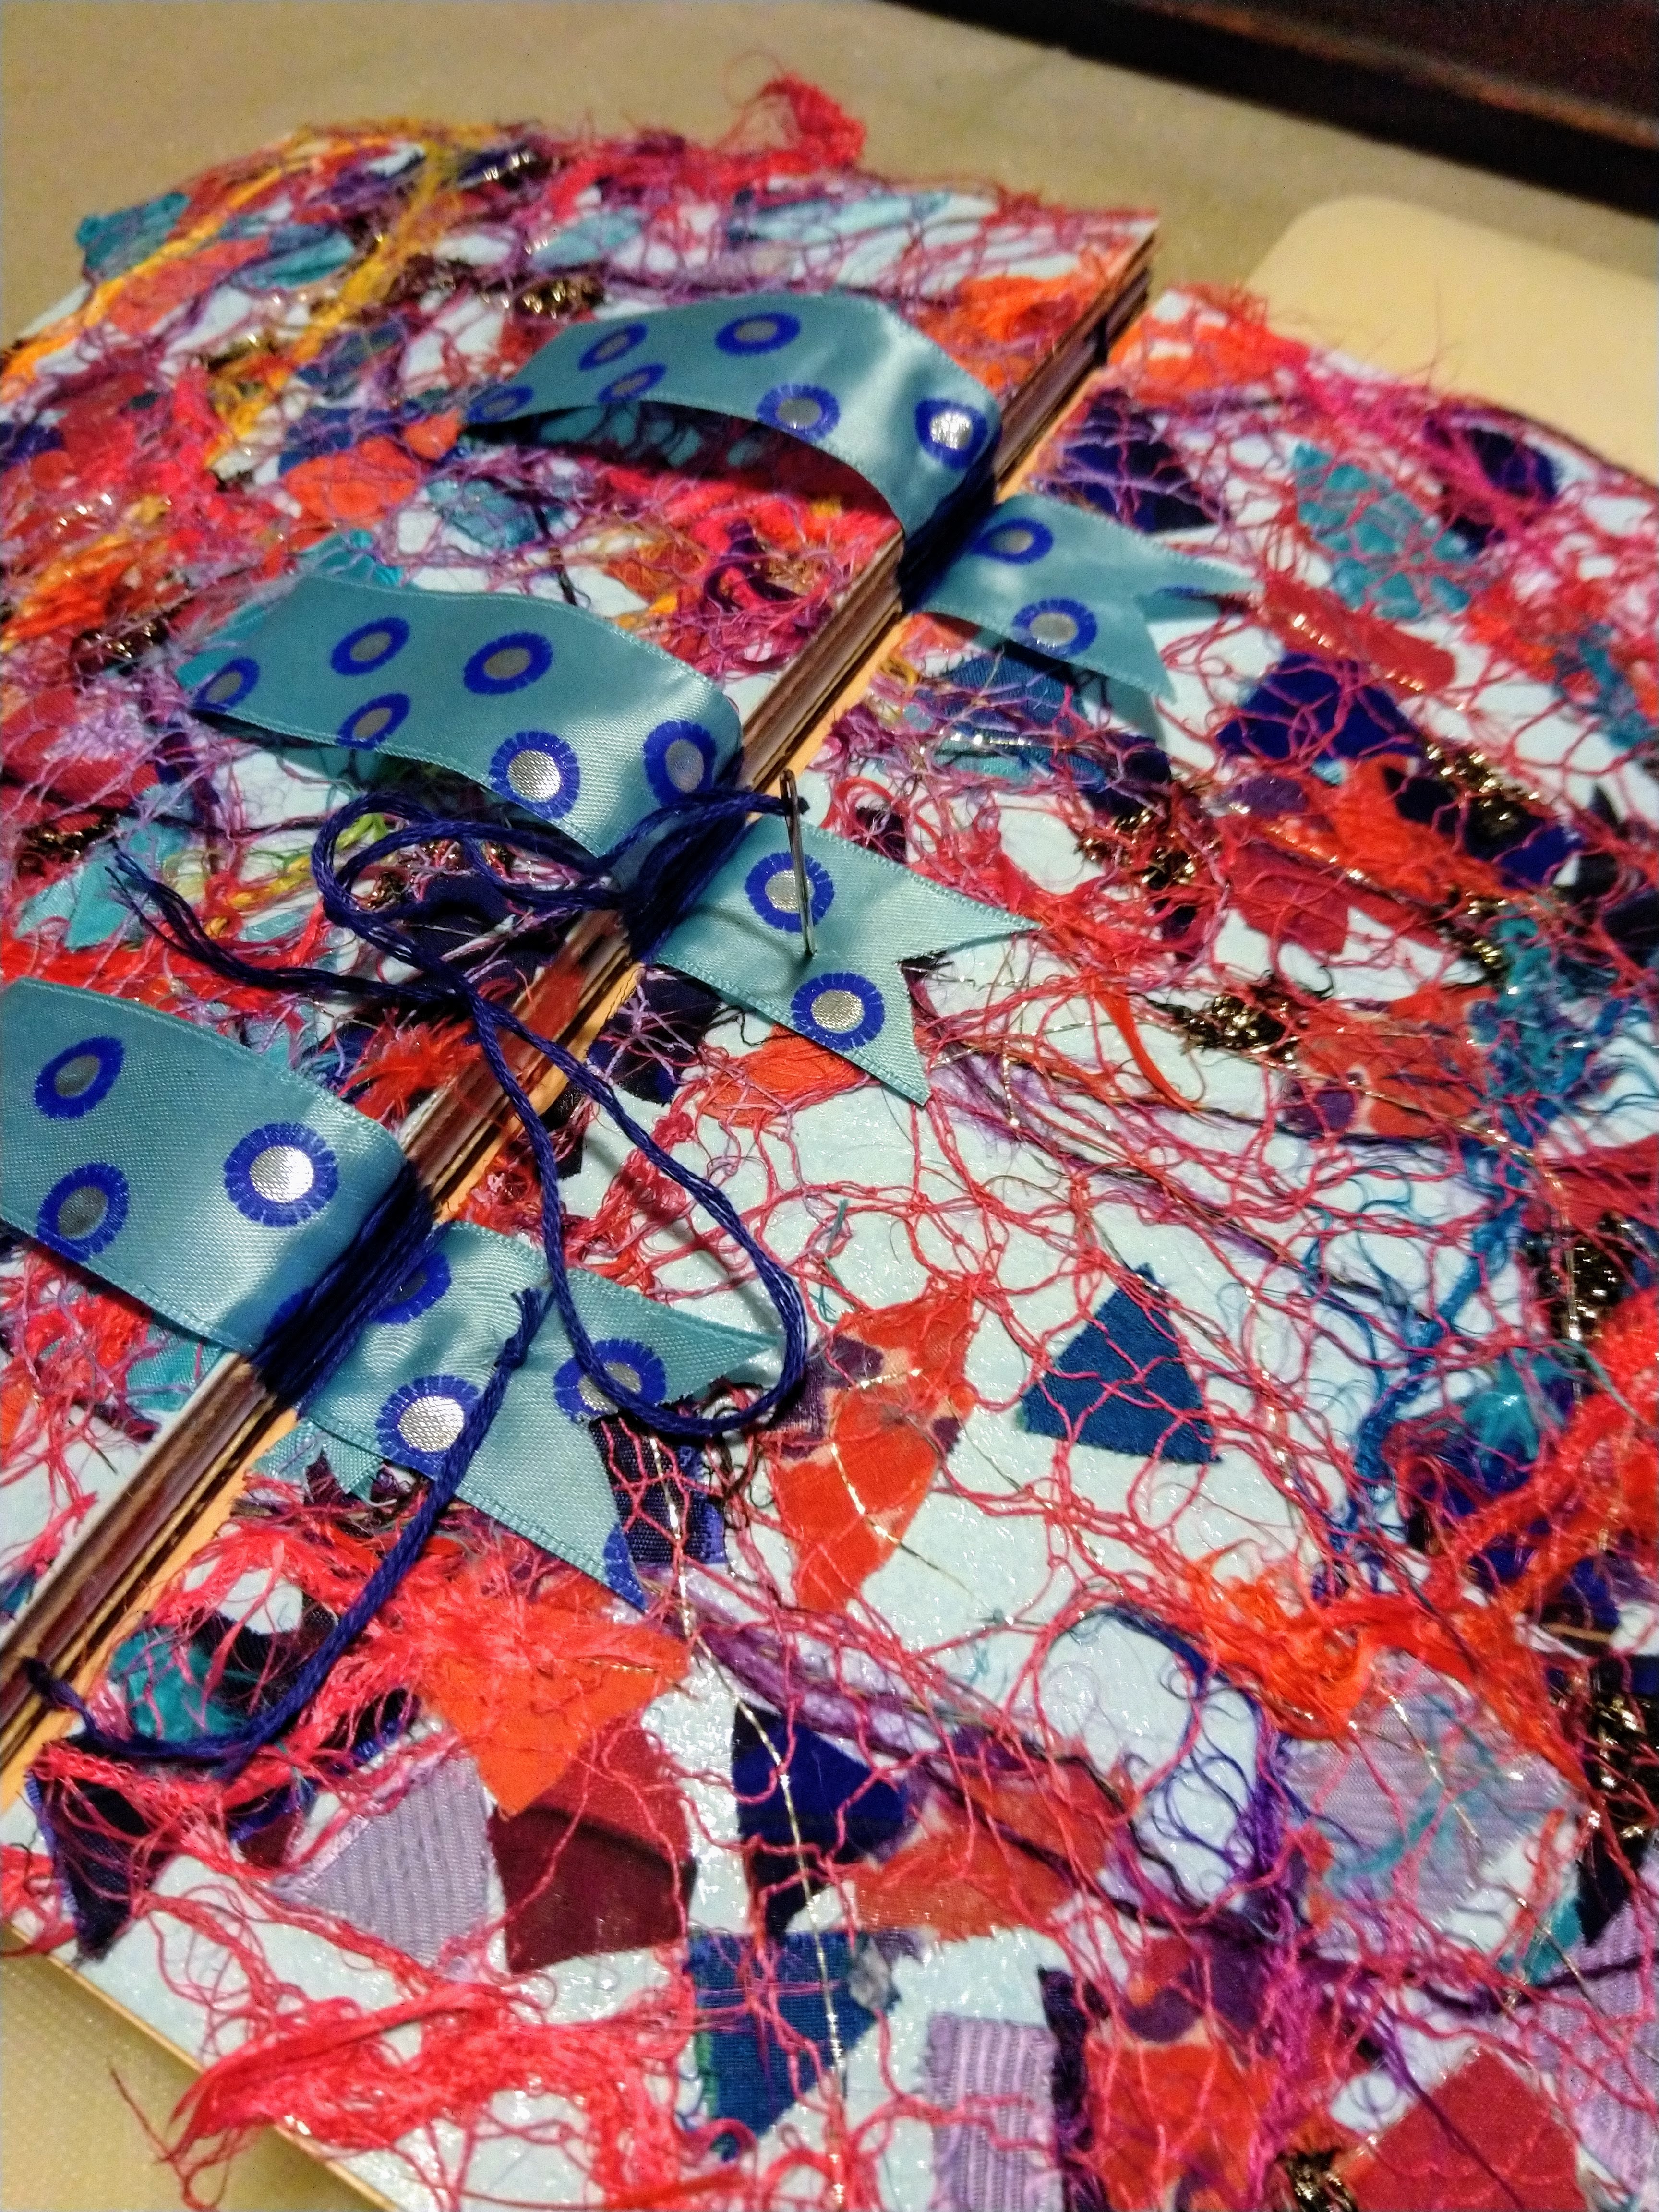
Handmade Stitch Sketchbook

This was a wonderful project to make my very own sketchbook. It made me ridiculously happy making this book and to now use it. The workshop leader was Ali Ferguson, who says that she makes these sketchbooks at the start of each new textile project that she embarks on.

We first started by choosing 21 pieces of A4 paper for the pages inside. I used lots of old artwork from my City and Guilds course, scrap lining paper, brown paper and some craft papers. Each page was folded in half so that the finished book was A5 with 40 pages (the first and last page gets stuck to the inside covers). We had to stack the folded pages inside each other into 7 groups of 3 to make 7 'signatures'. 

Next I had to decide what to use for the 3 fabric tabs that would hold the spine together, which also meant that I had to make a choice about the cover fabric. I settled on using a piece of 'machine lace', another City & Guilds sample - see my earlier blog post on how I made this. I chose to use some wide ribbon for my tabs. The significance of choosing the tabs was that it determined where to pierce holes for the stitching on the spine.


The technique for marking the holes was to take a strip of paper the height of the pages, fold in half and half again to get quarter points. Then the fabric tabs are going to lie equally over the 3 fold lines. In addition a hole is marked 2cm in from the top and bottom - 8 holes marked in total. I then used a thick needle to poke the marked holes in each of the signatures. Incidentally, in the above photo you can see that I included a pair of envelopes in the centre of this signature, an idea I got off the internet, held temporarily in place with masking tape.


Next was the stitching. I used embroidery floss approximately 8 times the height of the book. You start by stitching from the outside of the first signature, leaving a long starting tail, and make a running stich in and out of the pierced holes up the length of the spine, going over the ribbon tabs each time. At the top you come down the next signature in the same way, and then back up the third. At the top of the third signature, you loop the thread between the first and second signatures, called a 'kettle' stitch to link the spines together. You carry on in the same way for the rest of the signatures, adding a kettle stitch at the top and bottom of each spine until all 7 are attached. I found it very useful to use a bulldog clip to keep the pages in the signature aligned as I went. It was very important to keep the thread pulled tight throughout but without accidentally ripping the paper.

The ends of the thread were finished off by threading them back in the next hole along and then tying them off on the inside with a few knots.

The final stage was to attach the covers and secure the tabs. I cut the covers from thin greyboard and covered them in blue coloured paper before attaching the machine lace using bondaweb. I then glued down the first and last pages to the inside of the covers.  Next I cut a notch in the ends of the ribbon to stop it fraying before making a large stitch through the ribbon and cover, knotting it on the outside. 

Finally I chose 3 whacky buttons to finish off. The reason I didn't stitch the buttons at the same time as stitching the tabs to the cover was because I wasn't sure I would be able to get them lined up due to my buttons having a horizontal hole rather than vertical ones.
 

I was delighted with the result but there was more fun to come embellishing the inside pages with:
  • Deckle edge scissors
  • Sticky paper tape and ribbon
  • Scraps of decorated and printed paper
  • Stick on eyelets, borders, flowers etc
  • Hole punch
  • Felt tip pens


You can trim the edges of the pages which allows the page behind to show through. I am using the book to make notes of stitch techniques picked up along the way.
Ali Ferguson said that you can use any paper but black, brown Kraft paper and vellum are her favourites. You can also add in fabric pages, preferably using a stiffish fabric in the centre of a signature. It is also possible to add fabric or stich samples into paper pages but it is recommended to reinforce the page with an additional piece of fabric glued on with glue stich behind so that any stitching won't rip out.


Knitwear Bauble

This year my group of stitching friends decided to organise a secret tree decoration swap. We drew names using Drawnames.co.uk, which worked really well, and then had free rein to make whatever we wanted. I had enjoyed exploring using cut up charity shop knitwear in my Tree Bark Abstract so I had the idea of covering an existing tree bauble in knitwear and embellishing it.


First I found a free pattern on the internet for making a fabric sphere at www.annwoodhandmade.com - I was extremely lucky that the small size fitted the existing bauble exactly. I chose the 4 part sphere and cut 2 sections from the jumper ribbing and 2 from the body. 


I oversewed 2 of the panel together from the bottom, stopping 2cms from the top. I then added a third panel in the same way. On the fourth panel I initially stitched only half way up on both seams, put it onto the bauble and then carried up on the remaining seams in tandem. Finally I tidied up the top of the other seams until the bauble was tidily encased in the knitwear jacket.

Then I added the embellishment - a ribbon flower, a lace snowflake and numerous white and silver beads.


Finally I added a sparkly hanging thread!

My friend was really pleased with the bauble - here it is hanging on her tree.


Tree Bark Abstract - Ancient Heart

I made this piece from a workshop led by Sabine Kaner. Sabine is known for her very colourful embroideries using wool, felt, knitwear and other thicker fabrics. Her pieces are fairly abstract.


Her method involved crumpling different thicknesses of paper, drawing over the resulting lines to make them more prominent, simplifying or cropping the result if required and then tracing it onto fabric to inform an abstract piece. Some areas can be coloured with paint or ink, some areas filled in with fabric and some with stitch. Unfortunately crumpling paper to generate a composition did not appeal to me as it had no meaning. Instead I chose to trace the following photo I took of the bark of a very old oak tree in Shropshire.
 

My idea was to use fabric for the large chunks of bark and stitch for the dark crevices in between. My tracing paper was quite thick and I traced it off my tablet so that naturally forced me to simplify the image, which was helpful.

One of the aspects of Sabine's work that struck me as interesting was the way she frames her pieces with pieces cut from knitwear and I knew that I wanted to try this. I have an old wool jumper that was accidentally felted in the wash but I kept it as I loved the colour so this informed my choice of colours for this project. I searched out fabric scraps to complement the cherry year jumper:


Next I arranged the fabrics by tonal value and, using my original photo as reference, I marked on the tracing whether areas should be light, medium, dark or very dark in order to inform my fabric placement. I made a second tracing to use as a template and marked each section with a number to show the front of each piece and keep track of which piece goes where. After carefully cutting out each piece I used them as templates for cutting round my fabric, which I had backed with squares of bondaweb. 


I re-assembled this complicated jigsaw onto a large square of calico and when I was happy with my colour choices, I bonded each section down with the iron. My fabrics included corduroy, coating, upholstery fabric samples, a charity shop woollen tie and jumper, linen, slubbed silk and satin dupion.

Then I could begin filling in the gaps with embroidery. I worked in a hoop and used a variety of threads - silk, wool and embroidery floss - and a variety of stitches, such as satin stitch, long and short stitch and couching. I enjoyed trying out all these different techniques.
 

Once it was completed I turned to the border. I bought a cheap artist canvas and used that to determine the final size. I cut a rectangle from the jumper, keeping the waistband ribbing intact to use down the right-hand side for interest, and then cut out the centre for the embroidery. One thing I really love about these projects is the constant problem solving in order to achieve your vision. I realised that I couldn't keep the ribbing in tact and have it wrap around the frame so I came up with adding some additional red fabric I had around the outer edge of the calico to secure the whole piece to the frame. I did this with a running stitch and then stitched on the red woollen border with tiny stab stitches, both around the outside and inside edges.

It was quite tricky to get the edge fairly straight and even, given that the jumper is stretchy, but as it was well felted I could trim it back as required. 

Finally I wrapped the fabric around the back, held it with drawing pins temporarily whilst I used a staple gun to fix it to the back as neatly as possible.

I called the piece Ancient Heart. I absolutely loved making this piece, the story behind it and the final result. I tried fabrics I have never used in embroidery pieces before and enjoyed making new textures with my stitching. Plus I have had great feedback from friends and family, who all love the colours I have used.


Thursday, December 24, 2020

Scrap collage Christmas Robin

 This workshop was led by Mandy Pattullo, who is well known for finding innovative ways of using up scraps of vintage quilts, clothing and other needlework, often by appliqueing on top of them. She presented a method of creating a bird with fabric scraps, which was easy to follow and very enjoyable.


Here is my Christmas Robin using this technique.

I do not have any scraps of old quilt or patchwork so I chose a plain vintage handkerchief for my background and started by pinning it to a piece of ordinary white craft felt. I had some retro looking holly fabric so added a piece of that at the bottom to provide a bit of colour. I attached these together with machine stitch for speed - I was eager to get to the bird!

Mandy had stressed the importance of finding some source images and really observing how the different colours on the bird flow together. I sourced some photos and illustrations online. We were provided a template to use so I drew round that with a Frixion pen to mark the position and shape of the robin. 


I then chose scraps of red, white and brown fabric to build up the robin. The advice we were given was to start with the white belly, then layer on the red breast, then the tail and finally the back and head. I enjoyed rooting through my fabrics to find scraps to use and built up quite a few layers in each section over a base of a single colour.

I used a few pieces of satin to add some shine. The eye in this photo is just a scrap cut out of a black and white flower as I couldn't decide if it was right without putting on a temporary eye to bring it to life a bit! All these scraps were then held down with tiny stab stitches using machine thread in matching colours to hold it in place ready for the embroidery.

I used 2 strands of embroidery floss to add the feather detail in white and cream on the belly, 2 shades of red on the breast and 2 shades of brown on the back, wing and tail. The stitches on the breast and belly were just straight stitches in the direction in which the feathers would grow. I ensured the white and red stitches overlapped at the bottom of the breast to blend the two areas a bit. Around the top of the face and down the side of the breast I added some grey stitches to reflect the grey bits on a real robin. For the wing and tail I couched down the floss with the same thread to provide a stronger line.

Next came the eye, beak and legs. The eye was satin stitched in black, with a brown back-stitched outline and a tiny white french knot for the highlight. Next the beak - I thought it would look better if it was angled more upwards than the template so I started with a straight stitch down the middle of the beak, then 2 long stitches for the top and the same for the bottom. It looked a little short so I unpicked it and made it longer! Finally the legs were also stitched with long back stiches in 2 strands of brown. Mandy had shown us how to come down one side, stitch the back toe and claw, then 3 front ones and then to go back up the other side of the leg. Finally I ironed the bird to get rid of the red pen outline. This did not disappear completely where I moved the beak, but is very feint - a lesson learned for future.

Finally I had a lot of white background to add interest to. I chose a scrap of lace, which I had to fit around the bird's tail, plus a square of the holly fabric reversed. I stitched these down with cream thread in small running stitches, carefully going all around the bird's tail. I then added some curved lines of hand quilting and finally some branches of berries. These were backstitched with 3 stands of brown floss and lots of different shades of red fabric for the berries, which are just held down with small stab stitches. To complete the piece I added some brown straight stitches around the bird's feet to 'ground' him with a suggestion of a shadow.

I am very pleased with how this has turned out and would like to try sewing other garden birds on vintage handkerchiefs and maybe even a butterfly.


Sunday, August 23, 2020

Momigami Landscape


This piece was inspired by a workshop from Cas Holmes for the TextileArtist.org Stitch Club. The challenge was to use found paper, crumple it to make momigami and then combine it with fabric and stitch to make a landscape. 

Momigami means 'kneaded paper' in Japanese and is made by crumpling up, spreading out and re-crumpling the paper many times to breakdown the fibres in the paper and make it more pliable and stronger for stitching. Cas recommended that we use better quality paper and magazines or packaging paper as these will have longer fibres in the paper. Recycled paper or newspaper has very short fibres and therefore not advised. The best paper is apparently mulberry bark paper from Japan, which is very strong and has traditionally been used to make clothing using this technique!

In her demonstration Cas showed us how you might fold the scrunched paper when integrating with you fabric. This made me think of rocks so I found a photo I had taken on the coast of Guernsey as inspiration for my landscape:

I chose papers from art and gardening magazines for the rocks. Some of the colour came off the surface as it became more crumpled but this was fine for the impression of rocks. 

I also experimented with painted lining paper left over from my cut paper collages and brown paper bags. With the latter I added some rub-on metallic waxes to see the effect. This picked up the texture of the creased paper well.

I started by tearing the paper into the shapes I wanted but this didn't look right so ended up cutting them with scissors. I laid them out on a rectangle of old grey sheet, backed with net curtain to add stability.

This was my initial layout with paper for the sea and a few scraps of fabric for the sky. I was lucky to find a great picture of fennel in a gardening magazine which I decided to use in the foreground to add some plants that weren't in the original photo. As wild fennel grows on the coast I thought this could work well. Therefore I also added some flat green sections to the right and a path so it looked like there was a path down to the sea.

I wondered whether the paper sea was too much of all the same texture so I tried it with a textile sea for comparison:
The sea was a baby wipe I had used as a mop up cloth with some threads of dyed silk waste on top plus the same paper rocks as before but with eyelash yarn for waves around them. I thought this looked better than the paper sea so this is what I went forward with. In addition I added a piece of pale blue organza over the paper representing shallow rocks near the shore to tone it down a bit.

I used black, brown, grey and green machine cotton to fix all the paper pieces down using mostly small straight stitches following the creases in the paper, with occasional back stitched or running stitch lines. For the sea I used tiny stab stitches for background and then caught down the other threads with small straight stitches. For some shadow beneath the rocks I cut some small pieces of dark blue organza and included them underneath the surface threads.

The it was time to add some embellishment to the rocks. I added patches of orange for lichen, couched down thicker yarns for texture, created tufts of lichen using turkey work stitch and loose french knots in purple for the Thrift flowers in the rock crevices.
In the foreground I wanted to add some fence posts and 'barbed wire' with a few fennel flowers embroidered over the top. I found a picture of a timber-framed building from which I cut the posts and fitted them into the garden picture. For the wire I used some thin black yarn, couched down with ordinary cotton. I then added the barbs by tying double strands of cotton on at intervals and cutting short.

Finally I added the fennel flowers by couching down the full thickness of floss for the stems. I used 2 strands to stitch the flower stems and the foliage. Finally I used a strand each of yellow and acid green combined for the flowers, making quite loose french knots.
I enjoyed making this piece but I think that the perspective of the rocks part could be better. I finished the piece by trimming off the netting backing and trimming any fragile pieces of paper overhanging the edge.
Saturday, August 1, 2020

'Inheritance' - mixed media collage with momigami


At the start of the Covid-19 lockdown I had some personal news which made me consider what I had inherited from my Mom. She passed away 3 years ago due to breast cancer. As a result I made this piece in response, sparked by a community stitch challenge set by Cas Holmes.

All the fabrics in this piece are inherited from my Mom's stash. She made her own clothes in the sixties, often from furnishing fabrics as she found those more interesting. This is the case with the main brown/blue piece of fabric in this piece, which is from a shift dress she made and I had already cut into for a previous project. This piece is using the reverse of the fabric and the horizontal band at the top is the hem of the dress. For some reason she used white thread to sew the dress and pale blue to hand-stitch the hem! I love the fact that you can see her stitches in this piece.

I laid all this down on the reverse side of a piece of Sanderson curtain fabric - these were the bathroom curtains I grew up with! The edge of this is folded over on the right. These 2 pieces of fabric set the colour pallet so I went through my inherited pieces and found other fabrics to use.


I knew I wanted to incorporate this photograph of my Gran, Mom and me. I had never seen this photograph until we were gathering together photos to show at her wake but I knew exactly where it had been taken and it is one of the only photos with the 3 generations. I manipulated it with a sepia wash, printed it out onto ordinary printer paper and then used the momigami technique to distress it and make it easier to stitch into. I used a small amount of oil the first time but didn't like the effect so re-did it without any oil. Before laying it down I ripped into it so that I could use the motif from the dress behind, which looked to me a bit like the double helix of genes.

Finally I chose a corner of an embroidered handkerchief I found in her drawer and a strip of a shirt-dress she had made, again out of furnishing fabric. I fixed this all down with bondaweb and then started stitching. It seemed obvious to machine black lines to echo those on the brown fabric. I set the machine to a very slight zigzag to mimic the quality of the lines on the dress fabric. I finished off the ends within the photo but chose to leave them free at the bottom. I mixed 2 colours of blue floss to stitch a running stitch around the outline of the 3 generations in the photo to represent the family bond.


I wanted to add some free-machine flowers 'ala Cas Holmes' so chose the Marguerite daisy as my Gran's name was Marguerite. I drew it out free hand on thin white tissue paper copying a source image from the internet and then pinned it in place, with some small scraps of organza underneath the flower heads to make them stand out on the white background. After free-machining over the top I pulled off the tissue (tweezers essential) and added french knots in the daisy centres. Free-machining terrifies me as my machine doesn't really like it - the stiff cotton backing kept pulling the needle out, but I love the end result.

I then turned to the top and sides - I needed to soften them and bring them into the piece. After much playing around with tiny cut out pieces of fabric I settled on a re-interpreted floral design from some more Sanderson curtain fabric at the top and free extension of the floral and leaf motifs on the right hand side. Because the motifs were already cut out and I couldn't imagine sewing them all on ironed them all down onto bondaweb and cut them out again - good job I don't mind fiddly!

Whilst I was doing this the idea come to me to make a daisy chain across the piece to symbolise the link down through the generations. I made a sample of various ways of doing this and settled on using the cut-out daisy motif and backstitch stems.

On the left hand strip of orange I had the idea to use some buttons out of the vast button tin inherited from Mom. I chose some very seventies style wooden buttons with painted flowers that I can remember seeing in the tin when I was a child.

Finally, I decided to add french knots in the top band around the yellow leaves and flowers to echo the original Sanderson fabric. I also added them to the centres of the flowers. They look a bit like pollen, which is key to plant propagation.

I found that it was easy to make a complex work when it had so much meaning behind it.

Pounded Flowers


I just had a go at the not very genteel art of flower pounding. The results are very interesting and quite variable. This is a method to transfer the shape and pigment from flowers and leaves to paper or cloth. 
I had never heard of it until recently and then I heard about it from 2 different sources in 2 days - funny how that happens! It was fun, quick and very noisy!

I started by picking a range of flowers and leaves from my garden - lots to choose from.

I took a piece of thin white cotton, laid it on a piece of wood on a hard floor, with a tea-towel under the wood to stop it slipping. I selected flowers and taped them one at a time on the back of the cotton. Sometime I had to cut off the stalk or most of the back of the flower. Sometimes they stayed together and sometimes the fell apart - it was a learning thing! Sometimes I used a cocktail stick to help gently spread out any curling petals as I stuck down the tape.

Then - IMPORTANT - turn the cloth over and hit with a hammer, medium weight blows. Once the image was transferred peel off the tape and move on to the next one. I used a kind of clear parcel tape which worked really well on the cloth but was too sticky for paper.

I was intrigued by the look of the flowers after pounding and stuck them all down on paper.


I saw online that you should iron the cloth to set the images. I don't know what I am going to do with this experiment - obviously you can stitch into it or use Inktense pencils to draw in extra details.

Some flowers and leaves worked much better than others. The flowers with papery leaves such as field poppies, california poppies, cosmos, cornflowers etc worked the best. Pansies were really good as they had dual colours that were retained. Flowers that were tube shaped (Agapanthus, Crocosmia etc) seemed to be fleshier than daisy or more open types and didn't make a clear image. Pinks sometimes went brown. Bright reds and dark oranges usually looked like a blood stain! Blues usually kept their colour. Very thin leaves worked brilliantly but some hairy tough leaves didn't work at all. The Heuchera and burgundy leaves worked well, as did a soft fern. 

After publishing this post I came down the next morning to this sight:
A dahlia in a vase had shed its petals overnight. This is not a problem, I thought - this is an opportunity!

A rather beautiful one: