At college this week we continued to explore texture by heating and distorting stuff. We started with Tyvek paper and Tyvek fabric, shown in the photo right. You can use a heat gun or an iron and paint it with acrylics before or after heating. It has plastic fibres running through it to make it very strong that contract on heating. Apparently the paper is used by solicitors as 'precious paper' and the fabric is used to make protective overalls.
I preferred the effect of the paper after heating as it went into bigger bubbles e.g. bottom right. If you melt it a bit too much you get holes, which are good, and it disappears altogether, which is not! The fabric seemed better with a heat gun but was less stiff after the heating and generally made smaller bubbles in the surface.
We then moved on to carrier bags - just cut pieces and lay on baking parchment. Cover with another piece of baking parchment and iron over to fuse them together - the thinner orange supermarket bag melted quite a bit, which gave a good effect. You can also stitch into this.
Finally we tried 'soft sculpt' - the grey stuff in the photo. This looks like the foam bit of mouse mats or something you would find lining the inside of your car. You apply the iron to the surface, protected by a sheet of baking parchment and then whilst it is still hot you press objects into it to make an impression. You can only really do small bits at a time because it cools down quickly and when you apply the iron again you erase any marks you have already made in that area. Again you can paint it and stitch into the dips.
Here is a piece stitched using the Tyvek and carrier bag pieces from above.
I first printed some tissue paper for the background using one of my Brusho experiments in my Christmas Break post overlaid with some text pasted out of one of my husband's lesson plans on the formation of the earth's crust (he is a science teacher). I found out the method for doing this from a library book called 'From Image to Stitch' by Maggie Grey.
I crumpled up the tissue paper and ironed it on to some furnishing fabric with Bondaweb. I then attached the carrier bag sample with free machine stitch in variegated thread and then attached the cut up pieces of Tyvek in the same way.
Finally to dull down the whiteness of the Tyvek I rubbed on some gilding wax. I was inspired by the formation of the earth's crust where the rocks split apart and red-hot magma spills out.
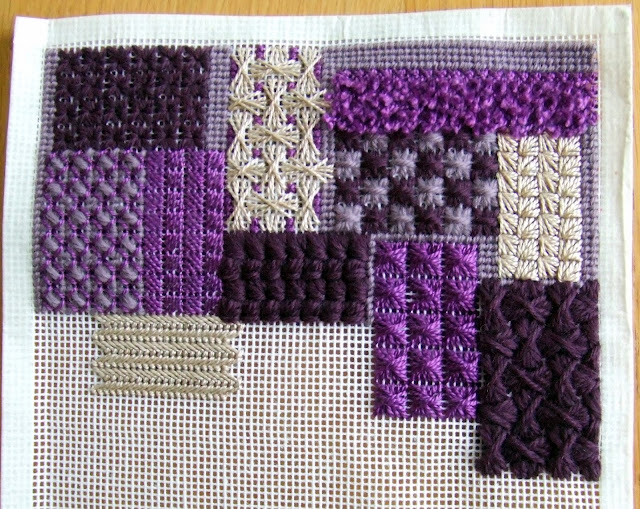
Then we moved on to canvas work. This is very traditional and takes ages. First we edged the piece of canvas with masking tape to stop it fraying and stop the stiff canvas catching the wool - a brilliant trick.
We are doing a sampler of set stitches in both tapestry wool and cotton pearle no 5 to see the different effects. From top left the main stitches are Algerian Eye, Vault, Velvet, Leviathan, Ray, Vault, Rhodes, Ray, Fishbone, Cushion and Rice. All the edges and gaps are filled in with Half-Cross.
Here are last week's stones sprayed with gold spray paint.
I have also done lots of other things this week but as they are for birthdays I cannot publish them until next week. Watch this space!.


