Monday, June 3, 2013

May Catch Up


Sorry I haven't blogged for a while. I have been undertaking a major garden re-design, which has taken up all my evenings and weekends. It is not quite finished but we are getting there. I has been creative in a different way to my usual outlets.

Here is a card I made earlier in the year - I love these quilled fringed flowers - use 20cm of 1cm wide paper that you have snipped the fringe into. Glue to the yellow/orange 3mm wide paper for the centres, about 5 cm each and starting with the yellow paper in the quilling tool, roll up tightly to the end and glue. When dry squash the 'petals' flat and glue to the card blank.

Here is my most recent card for my Dad. I wasn't very inspired so used my time in the garden as my source. I have these great floral photographic craft papers so stuck a rectangle of each on first. In the gaps I filled some blank spaces with glue and sprinkled on seeds that I collected last year - Evening Primrose and Cosmos daisies. You have to be careful putting it into the envelope!

Over the weekend we spent a lot of time in my parents' garden so I had a chance to do some drawing. This is Herb Robert, a native wild flower. It wilted really quickly once picked and the leaves blew around a lot in the wind so I didn't have the chance to spend ages on the shading. It is coloured using Inktense Pencils, of which I am a big fan as they are so versatile.

How about this bowl of Houseleeks for inspiration for an embroidery!

And I loved the colourful simplicity of this fabric wall spotted in the Pan Asia thai restaurant in Bath - would make a great bedhead idea.

Monday, February 25, 2013

Momigami collage completed

A couple of weeks ago I had progressed my collage using the momigami paper samples to the point where I was ready to stick it down using thinned wallpaper paste on a plastic sheet. After adding some more purple serviette pieces, this was where I had got to.

I followed Cas Holmes' advice in her book, The Found Object in Textile Art, and scraped away some of the paper layers with a blade to reveal the ones underneath.
Next I wanted to add some machine embroidery. First I experimented with a blindingly obvious idea from her book to bond a design already printed on some fabric onto the back of your work and stitch over it. I chose this flower on some curtain fabric.

I bonded it to some calico, on top of which I had bonded a square of green sheeting, a square of patterned furnishing fabric and a strip of shot satin.
I stitched over the design with free machine embroidery as best I could. I started off with cream thread and then swapped to black half-way through.
This was the result on the front using a thicker variegated rayon thread in the bobbin. It's quite good but I think I actually prefer the black thread on the original design on the back!
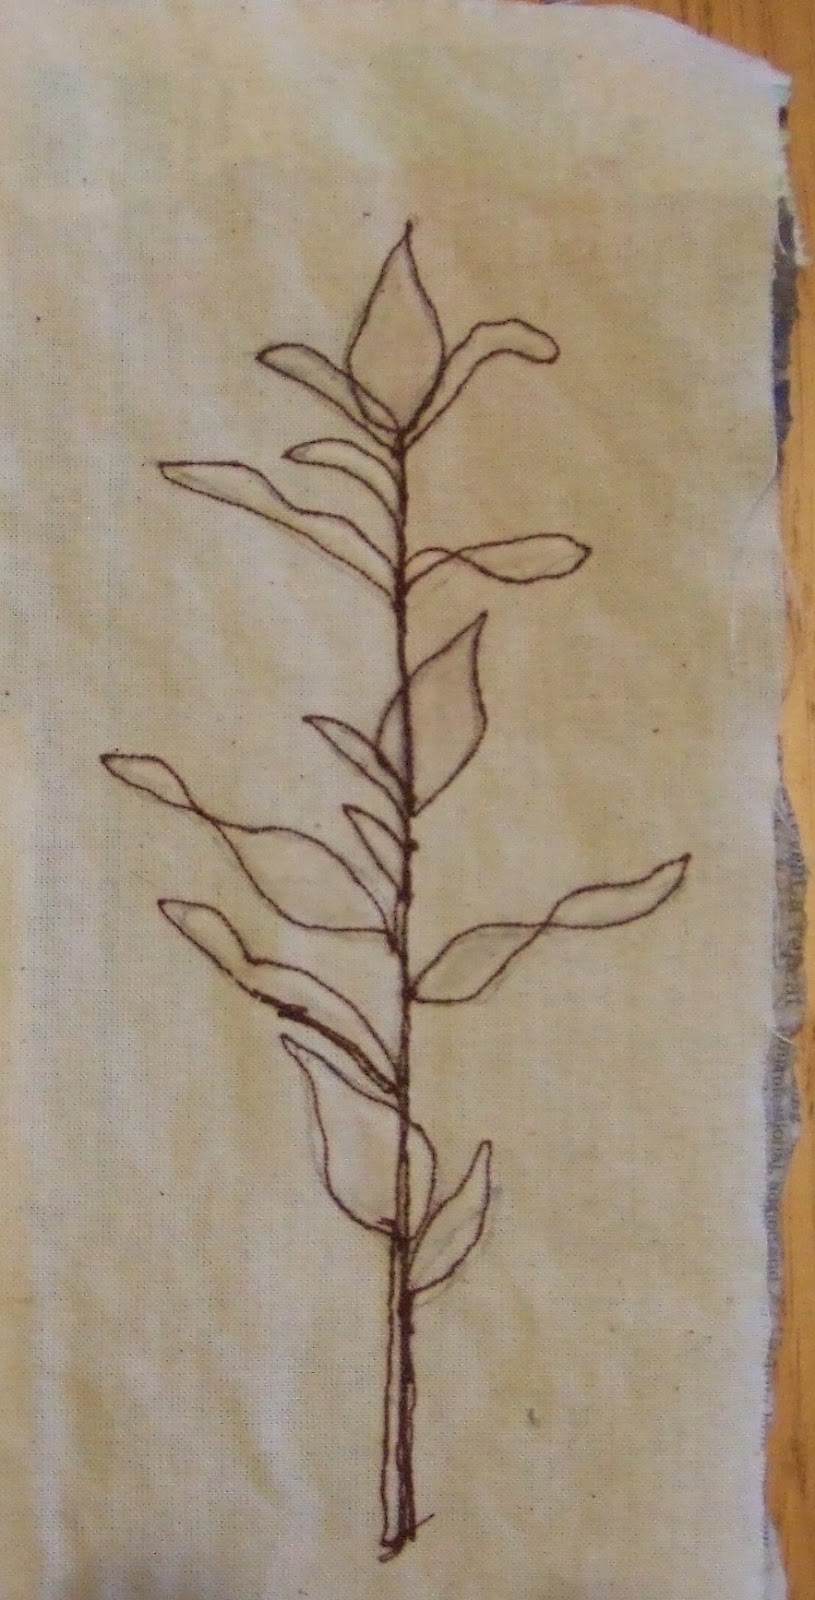
I then tried a free-hand drawing using a sketch of a branch sticking out of our hedge. I drew the outline in pencil on the back and then stitched over it. This time I had brown thread in the top and bottom.
Here is the front - I really like this. However, I decided to keep experimenting and got out my Inktense pencils to colour in the leaves.
I like this too. I used cheap fusible adhesive to stick the layers of my sample together which comes in a diamond pattern and this has showed through when I applied the pencil. A happy accident that looks quite interesting!
I coloured in the flower just to see if that made it any more interesting. It just shows how versatile the Inktense pencils are, as you can add water to make a wash.
So learning from my experiments I chose to stitch the branch design in a larger size on the back of my collage.
When I turned it over you could hardly see it! Because the background was already busy I didn't think that colouring the leaves in with the ink pencils would help much. However, where the stitches were so small it almost looked like the paper had been perforated so I had the idea to scrape out the centres of each leaf instead.
I took all the layers of paper away so I was back to the calico backing. Because I had used wallpaper paste, which is not that strong I could do this fairly easily and cleanly.

I am pleased with this as it gives an effect that would be difficult to achieve any other way - I was also lucky that I  had stitched over layers of paper, rather than fabric or a mixture. I know that I could cut the fabric away, in the style of reverse applique, but it would have been too fiddly to get into the pointed ends of the leaves cleanly.

The other elements I added were:

  • a leaf printed onto Bondaweb, with a piece of organza bonded over the top and then free-machined with a black and white variegated thread.
  • another version of the branch drawn on the front in gel pen and then a piece of organza bonded over the top part. Note the black around the corner where the iron went over the old till receipt - I wasn't expecting that and it will be interesting to see if it stays or fades.
  • I coloured in some of the flowers in the illustration with ink pencils and added pieces of organza.
  • I stitched some smocking stitch over a square of orange chiffon to echo my earlier 'wasteland daisies' piece
  • I cut some strips off my green serviette stitched in a random grid and partly washed away and noticed to my delight that they looked like ferns so I pasted these down with wallpaper paste. (They would also make good seaweed in a marine type piece!)
  • Finally I pasted down some threads of rayon frayed from the edge of some shiny furnishing fabric

It is maybe a tad busy overall but I have really enjoyed trying out all these different techniques and I have especially enjoyed the ease of combining paper and fabric. I will definitely be doing more.

Final tip - you can keep made up wallpaper paste for months in a well sealed ice cream container - a tip learned from my Mom, who was a primary school teacher and had a tub of paste made up under the kitchen sink for most of my childhood, which she used to mount her kids' artwork into brilliant displays!


Sunday, February 17, 2013

Birthday Cards

Lots of family birthdays to make cards for at this time of year. I started with this one for my Mom.

I covered a square blank with polka dot paper. Then I drew a bird and wing shape onto card to make a template and then cut them out of pink floral paper, being mindful of the pattern in the eye area. After sticking them down I drew in a branch and legs with felt tip pen.

To make the flowers I folded small squares of tissue paper 4 times to make a wedge shape and then cut a rounded end. When you unfold it has this pretty scalloped edge.

After sticking them on I added some crystals and a flower sequin for the eye with sticky dots.

This one was for my mother-in-law. I chose a butterfly print background with a matching tag. I mounted the tag onto card and attached it with foam spacers.

I made 2 pink tissue paper flowers as above and added green crystals with sticky dots as before.

Finally I used pink Crystals Tulip paint to decorate the edge of the butterfly wings, going over the dots already on the design.

All these papers come with Crafts Beautiful magazine quite regularly and I never buy any.

Next the tricky matter of what to make for my daughter's 17th birthday. I was attracted to these papers by the colours and I thought she would like them. The background of the card is made by layering up torn strips of paper - make sure you rip towards you if you want the white core of the paper to be exposed. I needed that to give some separation between all these colours. The dark blue strip is from an old paper bag that I kept.

Next I marked the numbers out on card. Luckily 1 and 7 are easily done with a ruler to make them neat.  I positioned them on the patterned paper and cut them out. Before attaching them with sticky pads I marked their position lightly with a pencil so that they would be level.

Finally I got all my sewing threads out and chose suitable colours to make a matching tassel. The instructions for doing this are here. You need to make a small U-frame for this size of tassel, which does make it fiddly to bind and tie off with navy thread. I attached the tassel head with a sticky dot and taped the ends on the back of the card. My daughter especially like the tassel so it was worth the effort!

Finally my valentine's card. I was going to buy one but they were all so awful I was compelled to make it. I got up at 6am the day before to do it!

Firstly I scanned in a copy of the original sheet music for 'Smoke get in Your Eyes' and printed it out. I've got loads of old sheet music passed down through the family from the days when singing round the piano was good family entertainment. I cut a square out a bit larger than the size of the card blank, folded it in half and drew half a heart on the back. Then I ripped out the heart shape. I crumpled up the remaining frame to give it some texture, then moved onto the background.

I chose 3 co-ordinating papers and ripped them out. I crumpled up the one with cogs on but left the others flat for contrast. I messed around with their placement until I was happy with it, trying the heart frame over the top to check. I stuck the background papers down and left to dry whilst making the tag. This was also pre-printed in one of my books of papers so I cut it out, made the hole and scuffed up the edge with a black felt tip. I cut a 'ribbon' out of the stripy card and checked it's final position.

Before sticking it all down I glued the end of the ribbon in the top right corner, then added the heart frame, then finally the other end of the ribbon on top. When it was dry, I trimmed off the excess music paper and used black rub-on wax to age the edges of the heart frame and some of the creases. I had a bit of the sheet music left over so I ripped a further smaller heart shape out of the title part of the music stuck that inside the card, so that it was obvious which song the music belonged to. My husband like it.

Sunday, February 10, 2013

Momigami - 'kneaded paper'

I was given Cas Holmes' new book 'The Found Object in Textile Art' for Christmas and although it looked really good I have been putting off reading it properly until I knew I could spend some time trying things out. The first thing I wanted to try was momigami - the Japanese technique of paper kneading.

I had just finished a bag of bread flour so that became my first experiment. To get ready I cut the bag open, got a craft mat and a small finger bowl with a few drops of olive oil in.

The method is to fold the 4 corners of the paper in to the middle and then crumple the whole piece into a ball. I think you fold the corners in first to stop the edges ripping. Dip your finger tips into the oil and coat your hands with a thin film. Keep squashing it into a tighter ball until it won't go any further. Carefully flatten it out. Add a bit more oil to your hands and repeat.
When you are bored of that flatten it out on your mat and stretch it out to the corners. You start to see the oil penetrating the paper and bringing out the texture. You can add more oil to your hands and smooth over areas that need more oil.

Then grasp one end in each hand and rub the paper together against itself, as if you were doing hand washing and trying to get a stain out! Repeat this action all over the paper, particularly at the edges to soften them up.
Above is the inside of the flour bag, which looks amazing, and here is the outside.

Once I had tried this I wanted to see what happened with other types of paper.
I tried newspaper, tissue paper, a till receipt and an off-cut from a piece of line design work created on my City and Guilds course last year.

The till receipt was particularly effective as it looked very worn and distressed.


Finally, with my bigger theme of 'wasteland' in mind I scanned in this watercolour painting of a twig I had done as a teenager and printed it out on ordinary computer paper.

I then gave it the momigami treatment and it came out like this.

What I like about this is that the oil in the process has lifted some of the colour from the image and helped it settle into the creases on the paper to give it a suitably distressed and vintage look.

I wanted to use some of these pieces in a sample so taking inspiration from Cas' book I am working along the lines of the following collage.  You will see that it incorporates some of my other recent experiments (leaves printed on Bondaweb, stitched and distressed paper napkins, transferring scanned images to fabric using Bondaweb - all described on previous blogs). What I really like about her ideas it the incorporation of paper and fabric elements in the same piece and this book gives a simple method to assembling it all to allow stitch.

In my next blog I will show how this had progressed.

Saturday, January 12, 2013

Plastic bag phone case

Happy New Year. Over the Christmas break I had time for 1 crafty project before I was struck down with illness again. I decided to make a mobile cover for my new phone. My last one got quite dirty from all the grease on your fingers so I chose to make it from recycled plastic bags.

I laid out a large thin piece of bag for the background on top of some baking parchment to protect the ironing board. I then cut out pieces from other bags to make my design. After messing about with a random design, I went for this jubilee inspired design with the intention of cutting it up in the next stage so that it didn't become twee. The black crown was not cut as intricately as this - it went like this during ironing - one of those happy accidents you get now and then!
If you don't like the strength of any colour turn it over and see if the other side looks better. I then ironed my design on the lowest heat setting of the iron, protecting the whole thing with another piece of baking parchment.

Next I cut out 2 pieces of white felt, a bit bigger than my phone, and covered them with Bondaweb.
I then took pieces from my plastic collage and fitted them on. Once I was happy with the placement I ironed them onto the Bondaweb, again on the lowest heat setting. It is really easy to melt the bags too much - I did this in the making of this and had to throw it away and start again.

Next I stitched round the edges of each main piece to ensure they stayed on during use and also to quilt it slightly. I used invisible thread on the top and normal white thread on the bobbin. One reason is because the invisible thread is plastic and I thought it would not pick up dirt as easily as white thread.

Finally I started to assemble the case. I began by stitching across the bottom edge, leaving a decent margin. Then I had to cut the top edge to size and round the corners. You have to do this now so that you can finish the top edge before you sew it together else it will be too fiddly. I finished the top edges with 2 rows of machine satin stitch.

Then I put the phone inside and pinned the sides to get a snug fit. I stitched them, rounding off the bottom corners and tried the phone for fit. Once I was happy with it (which did involve some unpicking a re-sewing as it was too snug the first time), I trimmed off the excess.

Finally I finished the edges with 2 rows of machine satin stitch. Where there were small patches of white felt still showing through, I daubed at them with a blue felt-tip!

The one mistake I made was to mark a rough outline of the phone on the white felt with a black pen which you can still faintly see through the plastic.

Overall it is wearing well and I have had comments on how unusual it is. If it doesn't last that long, it doesn't matter as it didn't cost anything to make.

Elsewhere, my family went to Mottisfont House to looks at the start sculptures. These were my favourites - acrylic creations hanging in a tree.

This one was beautifully made and implies the bend in space caused by a star. Sorry that I cannot name the artists - I have thrown the leaflet away.
Finally, my daughter decided that she would make a gingerbread house out of the Great British Bake Off Showstoppers cookbook she got for Christmas. It was a big undertaking and she got fed up waiting for the royal icing to set to hold the roof on. So here I am with the roof panels propped on a sweet tin and a strange lego-shaped lunch box, trying to get it to set in place.
And here is the final house and grounds - well done Millie. It tasted really nice too!

Tuesday, December 25, 2012

Stitched paper grids


Haven't had time to do much since I started my new job. A few weeks ago inspired by one of Gwen Hedley's books I had a go at stitching a grid on a paper serviette. This is one quarter of one. I machined a random grid and put a few rows of machine pattern in for good measure.
When done I dunked it in a small bowl of warm water and the serviette paper washed away easily. There were clumps of pulp in the bottom of the bowl which I reapplied to the piece in a few places to add more texture.

I like the finished effect but I haven't had time to do anything further with it and incorporate it into a more layered piece.

I have had time to make a few Christmas cards for my family. This one uses quilled closed and open shapes plus some fringed pegs for the snow crystals. I just used ordinary printer paper cut to size on the paper trimmer and stuck them to a metallic blue card blank. It was quite fiddly!
Here is a bit of a retro looking one. All the light bulbs use a whole length of quilling paper. For the flex I wrapped a length of black quilling paper around a long wire - I found a kebab stick was not thin enough. For the rings that join the bulbs to the flex I wrapped black paper around the fat end of the quilling tool a few times and then squashed them into shape with my nail.

The blue tag and sentiment were free with a craft magazine! All mounted onto red striped paper on a red metallic card blank.

Finally I made a birthday card today for my friend's teenage daughter. She likes baking so I chose a cupcake theme. The pocket on the card is made out of a 16cm square of double sided paper. Fold the square diagonally in half with the fold horizontally across the bottom. Then fold each point up to touch the opposite edge of the triangle so that the upper edge of the folded piece is horizontal. Then fold the upper flap down to make the pocket. I made a mini tag to go in the pocket and mounted the whole thing on foam pads on a polka dot covered card blank.
This is another thing I have been doing with serviettes. I got this from the latest Kirstie Allsop series and amazed a waitress in the restaurant where we had our work's Christmas meal by producing one of these for her - didn't get us any freebies though!

To make it open out a serviette and fold each corner neatly into the centre to make a smaller square. Do this 2 more times folding in to the centre on the same side as before. Then turn over and fold the corners to the centre a 4th time. The carefully pull the top flaps on the back round to the front, squashing the corner in with your thumb. Don't pull round fully as it tends to lose its shape. Then gently pull the next layer of flaps round to the front and finally fold the last layer of flaps round to form the outer row of petals/leaves. Be careful not to tear the paper on this single layer. Tease into shape and put on the centre of your poshest dinner plates to wow your guests!

Finally as part of my induction course for the new job working for Carnival UK, we went on board the Oriana P&O ship. Didn't expect to find any textile interest there but I was wrong. Here is part of a large number of panels decorating the White Room - the Marco Pierre White restaurant on board. I am grateful for a reader of this blog who has identified it as a series of 6 large panels by Alice Kettle commissioned in 1994-5 called Glimpses of India.

Saturday, October 20, 2012

Patchwork Bag

My sabbatical year has ended this week as I started a new job. I have enjoyed my 'year of being more creative' hugely but it was time to move on to the next stage and earn some money! I will still continue to update my blog, but maybe not as frequently as before.

To get one last 'sewing fix' in before I went back to work I made a new work bag. It is made entirely from upholstery or curtain fabrics, most of which I was given by the local department store as they couldn't bear to throw them away.

Each patchwork piece is 15cm square and I used the same fabrics front and back. The top strip is 5cm high and the bottom is 15cm high. The handles are 65cm long. All measurements include 5-10mm seam allowance.

After sewing the patchwork squares together on the machine, I attached the top and bottom strips.
Then I cut out 2 pieces of fleece from an old blanket (the bright green in the photo below) and 2 pieces of dress lining. Making a sandwich with the patchwork on top, fleece in the middle and lining on the bottom, I quilted round the patchwork squares 'in the ditch'.

On the front I added some extra decoration - a row of grosgrain ribbon, a row of lace and a row of thin ribbon. These are all pieces that I have saved in a box from chocolates or those annoying loops to keep clothes on the hanger in shops. Where the thin ribbon wasn't long enough, I had to make a join so I covered this with a cute bow.
Next I stitched the sides and bottom of the bag together.

To make a flat bottom, I turned the bag inside out and squashed the corner flat, matching up the side and bottom seams. I ruled a line across at 45 degrees, measuring down from the corner each side to check it was even, and then sewed across. I tacked in a piece of craft vilene to give the base a bit of rigidity.
Then I started on the lining. I was using 2 cotton fat quarters that I had lying around. I wanted a big pocket but the cotton was very thin so I bonded a large square of calico behind the pocket area with Bondaweb to reinforce it.

The pocket is 2 pieces of dress fabric, 1.5 times wider than the finished size. I sewed round 3 of the sides, right sides together and turned through. Then pressed under a channel for elastic at the top and sewed that. I basted 4 pleats on the bottom edge, threaded elastic through the top edge, pulled up the fabric to match the bottom and stitched to secure. Then I could sew the pocket to the lining. I used the pattern on the lining as a guide, which was handy! Finally I sewed the 2 pieces of lining together along the sides only.

Then I made the handles by putting 2 strips right sides together and sewing down the long edges only. I turned them through with the aid of a large safety pin, pressed and sewed a zig-zag top-stitch down both sides to keep them flat. I used zig-zag so that the stitches could give if the handles came under strain.

The final assembly is the tricky part as there are so many layers to sew through by now. I started by sewing the handles on firmly inside the top seam allowance and pinning them out of the way. They are lined up with the edge of the second patchwork square.

Then with the bag right side out and the lining wrong side out, pull the lining over the outside of the bag, line up the top edge and side seams, pin and stitch. Turn the lining to the right side and press. It would be advisable at this point to top-stitch the lining to the seam allowance to stop the lining rolling out to the outside of the bag, but I didn't think to do it until too late so had to add a row of top stitching round the top at the end.

Next I pressed under the raw edges of the lining on the bottom edge and sewed them together from the right side. I pushed the corners in to match the shape of the bag and sewed across them too so that things won't get lost in the folds of lining at the bottom of my bag. And that was that - I am so pleased with this, it makes me smile every time I look at it.