Tuesday, March 29, 2022

Fox Brooch in a Matchbox

 As part of a group of friends that practice textile art, we came up with the idea of exchanging decorated matchboxes for Christmas. We could use any size of matchbox, any technique to decorate it and put anything inside.


I did some internet research and came up with the idea of a scene inside a large matchbox containing a sleeping fox brooch. I came up with the sleeping fox idea after seeing something similar in a library book with some simple felt decorations. 


I started with an oval of orange felt for the background and then stitched the body, tail and face elements on top using blanket stitch. Some definition on the body and features of the face were embroidered on top and a pin clasp stitched onto the back. 

I then fitted the fox inside a burrow in the bottom of the matchbox tray using a crumpled brown paper bag for the burrow, distressed with brown rub-on wax. Note that I lined the inside of the matchbox with plain white paper first.


Next I cut a tree trunk out of plain white card, making sure there were tabs to stick it to the inside of the matchbox and that there was enough space to get the fox out of his burrow. This took a bit of trial and error to get right.


Before I stuck the tree in place I decorated the inside of the matchbox with Inktense pencils, a metallic gel pen for the moon and then a black fineliner for the fine details of distant trees and foliage etc. Notice that the decoration comes all the way up the sides.


Then I could add in the tree trunk and add shading onto it to make it more realistic. It was very fiddly to stick all the small tabs in place and hold them until they were dry!


Finally I covered the outer sleeve with some fabric I had printed from garden foliage in a previous Stitch Club workshop, which I thought would add to the slightly magical feel of the whole scene. The friend I sent it to was very delighted with it.


Monday, December 6, 2021

How to make a Foliage Christmas Wreath


Every year I like to make a foliage wreath for my front door, usually on the first weekend in December. I use foliage cut from my garden on a shop-bought base. Try to find a base that is thin twigs twisted together rather than the twisted willow kind as it will be easier to push the foliage straight in without having to use wire to hold it. This year I have made 2 wreaths - a large one for myself and a smaller one for a friend. The smaller one has foliage all the way around, which is how I usually make them. However, this year I decided to try something different for the larger one by having foliage only 3/4 around for a different effect.
First you have to cut some foliage. Although I have a large garden I don't grow anything specifically for wreath making  - look for anything green and sturdy or dried. I always use pieces of conifer to cover the base but after that you can try anything. I think the key to making your wreath look interesting is different sizes and textures of leaves. I cut: 

  • Conifer
  • Lonicera Nitida (small leaved hedging plant) 
  • Rhododendron buds 
  • Camellia buds 
  • Broom 
  • Ivy and Ivy flower heads
  • Viburnum 
  • Red dogwood stems
  • Japanese anemone seed heads
  • Oregano seed heads
  • Montbretia seed heads
  • Dried Lavender flower heads
Holly or anything with red berries would be ideal but I don't have that growing in my garden any more.

Start by covering the base with pieces of conifer - strip the bottom 5cm of stem of leaves and push it into the base, gently but firmly. Ensure the piece is pushed it at an angle which will allow it to lie flat on the wreath but follow the curve of the base. 

You will see that I have also wrapped a piece of garden wire around the top of the wreath, which will be covered up later. This is to allow me to secure the finished wreath to a door hanger at the end.


This is the small base completely covered with conifer - note how all the pieces of conifer are pushed in the same direction.

Here is the larger base covered about half way round in the same way but with a small piece pushed in the opposite direction at the bottom. I have started to add some pieces of Broom too.

Next I've added some Ivy stems. If you can get a long piece I like to curl it around the inside of the wreath when I'm making a full one like the small base - just push it in firmly on the inside half-way up one side, curl it round and push the other end in where it finishes.
Then start adding some bigger leaves - here I like the buds of Camellias and Rhododendrons. Strip off the bottom few leaves to get a bare stem then push it in through the conifer. Around the outer edge I have added some Japanese Anemone seed heads and stems of the Lonicera, which all have completely different types of leaves. Notice how they are pushed in at an angle to keep the circular movement around the wreath.
Here is the same stage on the larger base. I've focussed on adding smaller leaves or more dainty foliage to the part on the bottom right facing the other way as a contrast to the rest of the wreath.
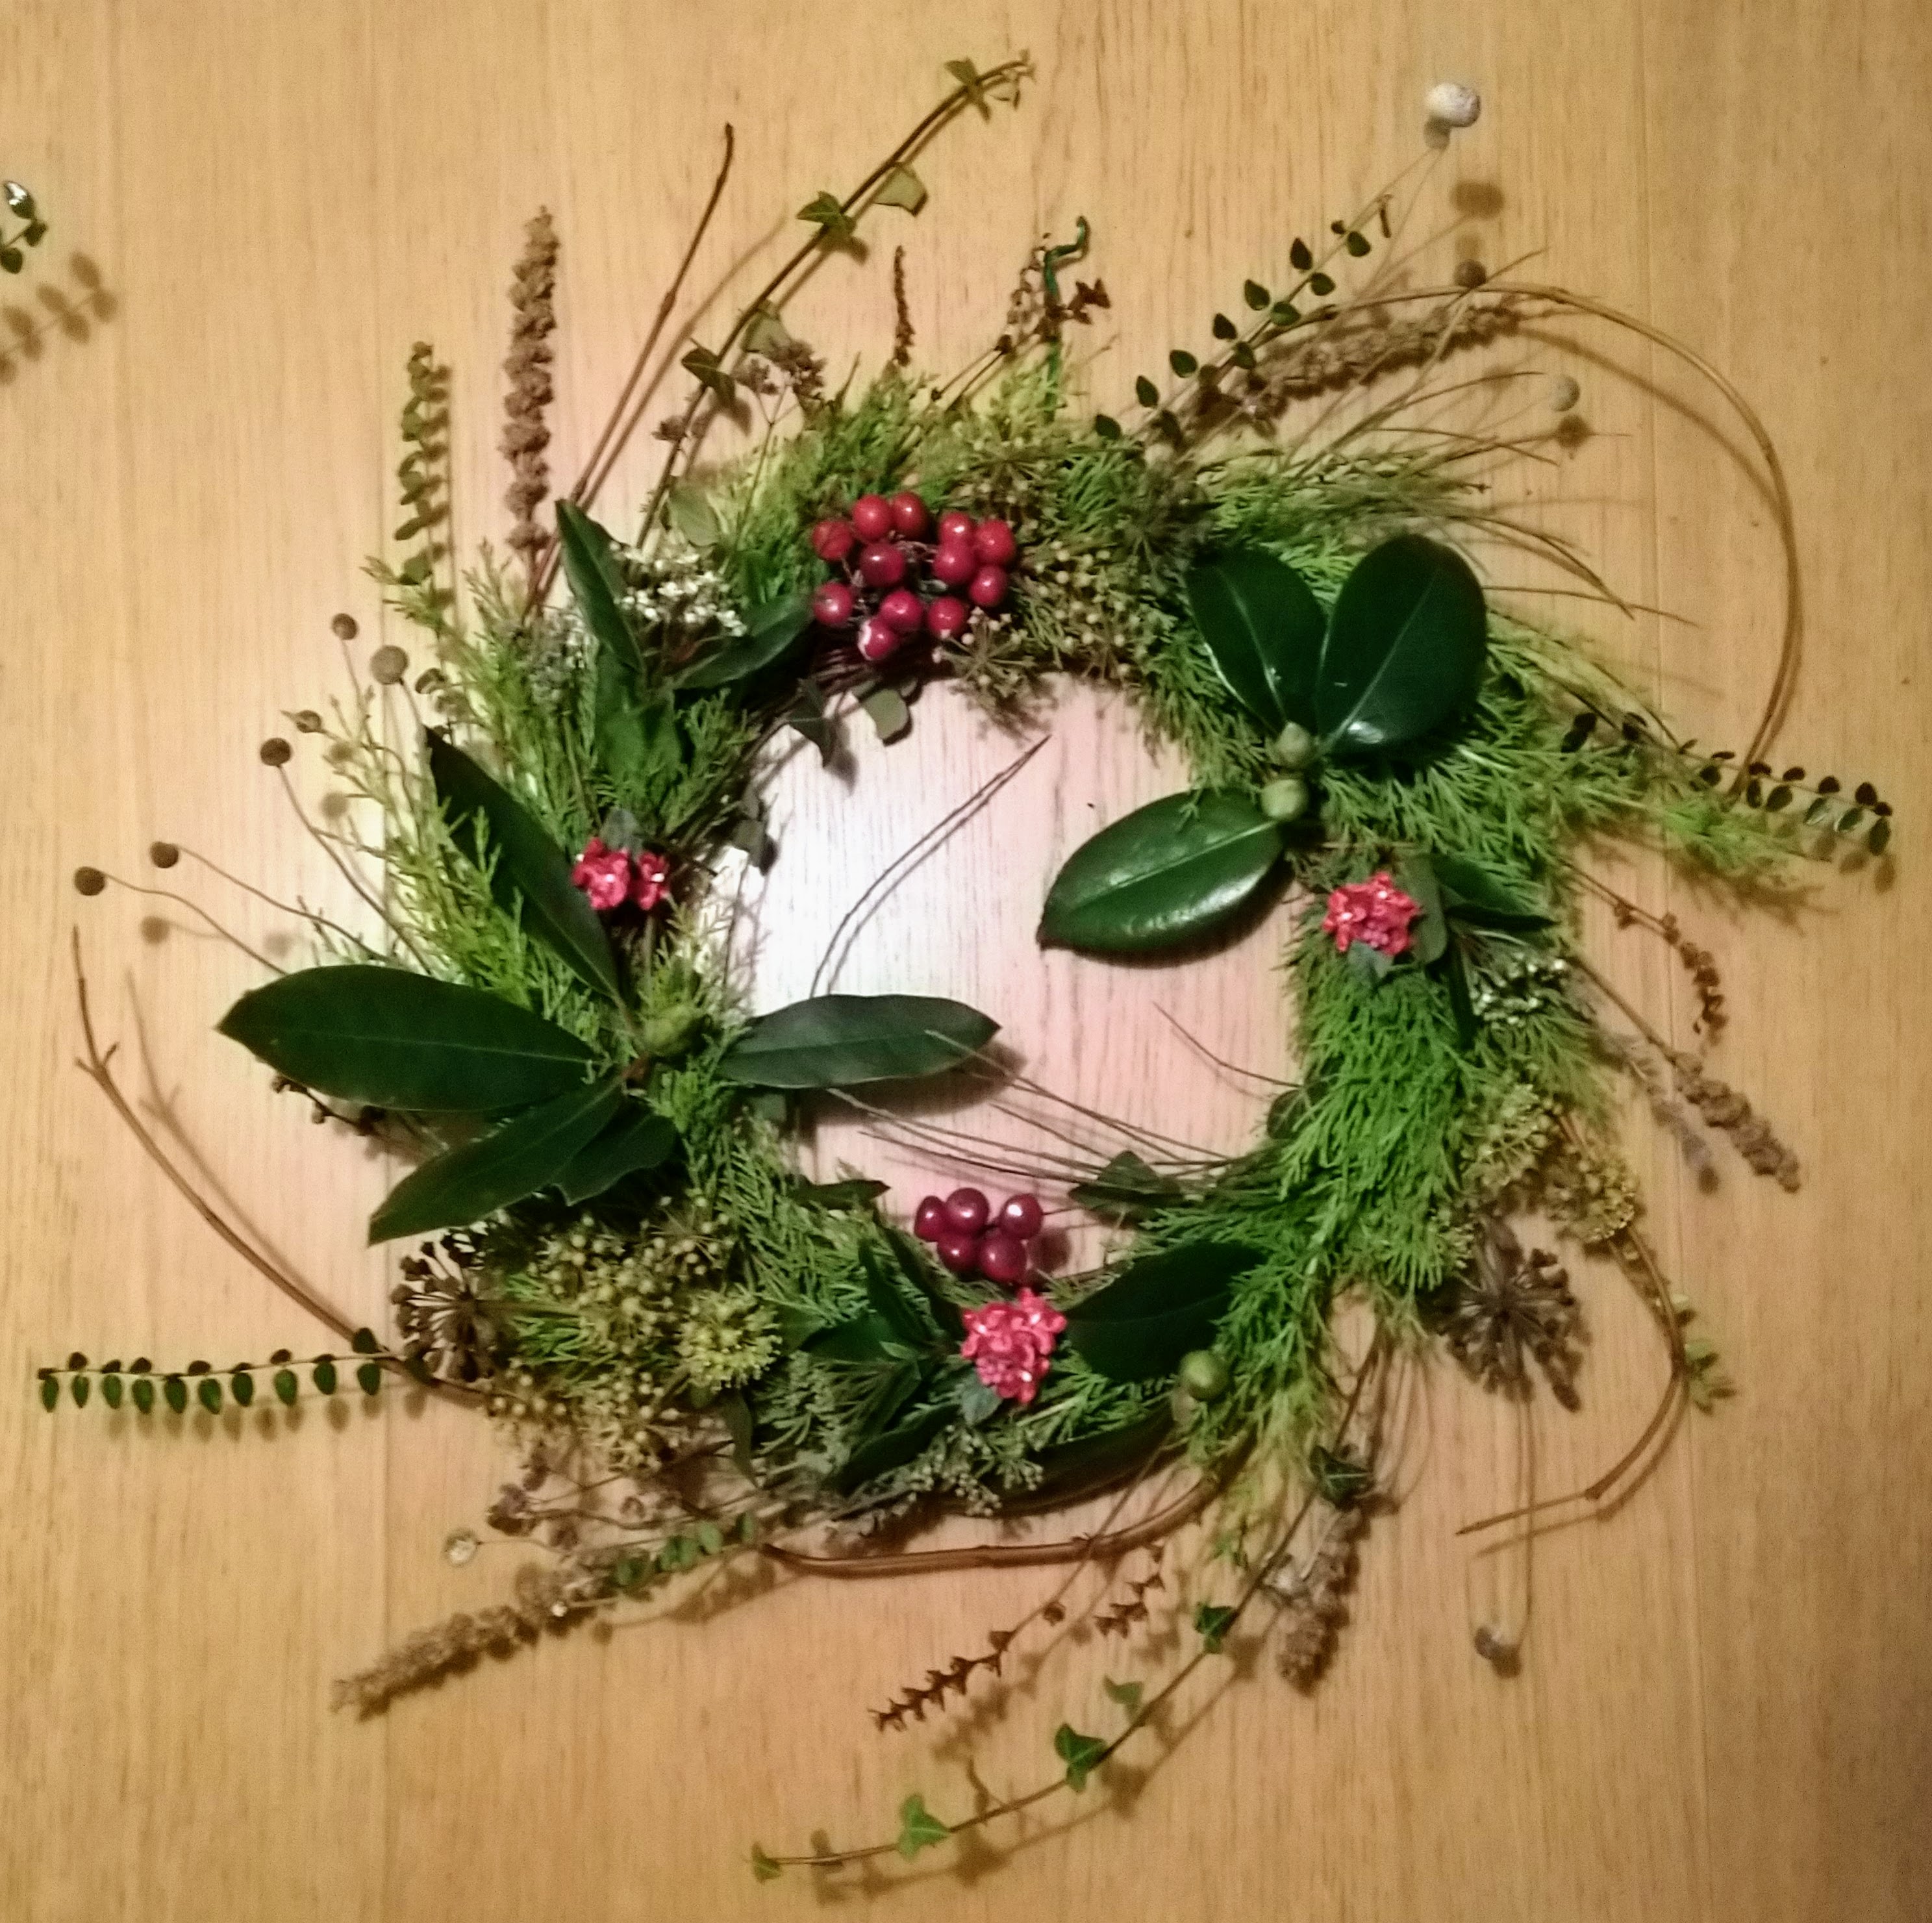
Fill out the wreath with pieces of any other foliage that you have. I have used Ivy flowers, Viburnum flowers and various other dried seed heads - some of which are from weeds! Just make sure to keep pushing them in at an angle to keep the circular movement around the wreath.

Finally add some pops of colour - I have used red Dogwood stems to curve around the edge (they grow in this curved shape) plus some artificial red fabric flowers and artificial berries as I don't have anything red growing in my garden this year unfortunately.

Here is the completed larger base - this one has artificial white Christmas Roses (Hellebores) at the bottom to cover the join between the 2 sides of foliage.


And here it is on my front door! I was worried that the asymmetric design might mean it didn't hang properly but it seems ok. I have it hanging on a door hanger purchased from a pound shop - I dig the bottom hanging hook into the wreath base and then twist the wire around the back so that it can't be blown off in the wind. Once Christmas is over and you take down your wreath, gently pull out all the foliage and throw away (saving any artificial additions of course) and store the base in a dry place until next year - this is probably the eighth time I've used this base.

Apologies that most of these photos are taken in artificial light, which is not so clear as daylight. The short days in December mean this is inevitable.


Saturday, July 10, 2021

Folk Art Chickens


This folk art style piece is called 'The First Egg!' and was my response to a workshop led by Saima Kaur for TextileArtist.org Stitch Club. Saima's work is influenced by traditional Indian Phulkari embroidery techniques which uses bright colours and simple/naïve style figures and motifs. Her work draws on this to portray modern themes and ideas, often with a humorous or personal story.

She started by encouraging us to draw some people or animals based on simple shapes, such as circles, rectangles or triangles, adding absurd elements like long arms, whacky props and text. My nephew had been given 3 chickens for his birthday and the week before there had been great excitement when the first egg was laid. Therefore I decided to use this event to inspire my piece and make it for him.

I started as I often do with image searches for inspiration. I find the 'collections' feature in Google very useful for saving all my searches in a folder so that you can view them all together.
I began to draw my own set of chickens, gradually trying to make them more exaggerated and humorous e.g. fatter, taller, animated, goofy. Once I had the feel for that I began to work on my composition.
I chose my favourite 3 chicken drawings and transferred them onto a piece of A5 paper. I made up a story that the black chicken laid the first egg (although no-one knows), the white chicken is the bossy one and finds the keenness of the black chicken annoying; the brown chicken doesn't care about anything but eating everything in sight. They live in an apply orchard, hence the branch of apple blossom. 

Once I was happy with my composition I went over with a fine black marker so that I could put it on a light box and trace it through using a water soluble pen. I then put a piece of plain cotton on the back to act as additional stabiliser and hooped it up.
I used 3 strands of variegated brown floss (DMC) and outlined the shape with chain stitch before filling is it, effectively stitching round in a spiral to the middle. I was amazed how the pattern of the stitches really mattered in the final look of the 'feathers'.
I then added the detailed features. I used a herringbone stitch for the tail feathers and satin stitch for the comb, wattle, beak and eye. I backstitched around the comb and eye to make them stand out and added a french knot for the centre of the eye. Finally I used backstitch for the legs and feet. 
I went on the stitch the white chicken in exactly the same way. It was hard to keep the chain stitch rows close enough together, especially when going round the corners. 

Finally I stitched the black chicken using variegated thread in the same way.

The last step was to add the background details. You will see that I did not put the sun in as I felt that it was busy enough. I left the egg until last as I was afraid that I wouldn't be able to do it smoothly. One tip I picked up was to backstitch around the outline of the egg and then satin stitch over the outline to make it neater and give it a slightly raised appearance. Saima recommended filling in large areas using Romanian Couching, which is economical with the thread. The lettering was stitched in small back stitches and the straw is seed stitch using 2 different colours of floss in the needle.

The final piece was backed onto an art canvas with a layer of thin fleece underneath and fixed on the back with a staple gun.

My nephew and his family loved the final piece and it now sits in pride of place on the bookshelf in their living room!


Silver Birches - stitching on painted Vilene


This was a very interesting workshop led y Emily Notman as part of TextileArtist.org Stitch Club.

Her method is to stitch onto painted Vilene (dress interfacing) with loads of texture and then either mount flat or wrap around old jars to create a textile vessel. I had in mind to create a silver birch forest for this piece - not sure why, perhaps I had been walking past a lot of them recently!

This was the thickest weight of Vilene I could find in my stash left over from dressmaking. It was cut to fit around a large glass jar so measures approx 30cm x 18 cm. 

I started by choosing thin textured fabrics to layer in the background and then thicker fabrics for the tree trunks and the distant fir trees.
The trees were stitched down with thicker embroidery thread and hairy wool to secure then and add interest. The cheesecloth at the bottom was stitched with tiny stab stitches.

To add the knots in the silver birch trunks I cut off bits of cotton lace and stitched them on.

This worked really well.


The next step in the process was to sponge on some emulsion paint. This was slightly watered down and applied with a kitchen sponge. I went heavy on the background and fir trees but lighter on the birch trees and cheesecloth so as to not obliterate the texture. Emily Notman explained that she uses Vilene because it is cheap, doesn't fray and is easy to stitch into. She uses a lot of emulsion tester pots for the painting step as it is cheap, available in masses of colours and helps to stiffen up the whole piece so you don't need a hoop.

Once dry I added some colour to the fir tress with Inktense pencils. I had in mind a scene at sunrise hence the strange pinky colours!
Now to add the undergrowth - I cut small circles of different fabrics - mostly bits of sari silk ribbons, sari chiffon or lining fabric, mostly because they were in the right colours but also had a bit of stiffness. Using machine thread I stitched them down using a small stab stitch, pulling it tight to pucker it up into a flower shape. Massed together they make a very effective undergrowth I think.
Then I started to mix in french knots and random straight stitches in wool. This was very quick and satisfying to do.
We found that if you did a messy french knot it made a large loop and looked really effective.
The final step was to add a wash of colour to the sky. I used some Brusho colours for this, watered down by different amounts to get the graduated colour I was after. 
I was very happy with the final piece and very much enjoyed making it. I looked at wrapping it round the glass jar but felt that it lost the impact of it being a forest so I have left it flat.


Handstitch sample Book


This was a lovely relaxing project based on a workshop from Jude Kingshot as part of the TextileArtist.org Stitch Club. She demonstrated a simple technique for making a small fabric book using white organdie as the basis for the pages. This is a stiff open weave fabric that I had never bought and the white simplicity of the finished book was lovely but did not inspire me particularly. 
I looked through my stash and picked out a very strongly coloured large cotton handkerchief- the complete opposite! In order to make it a bit stiffer I sprayed it with laundry starch, which worked very well. (Do protect your iron and ironing board with baking parchment if you do this - it took me a long time to clean up properly after this session! ) 

I cut the hanky in half and ironed a fold down the middle to make 2 pages. My approach to this book was to (a) use my new sari ribbons, which were equally colourful as the hanky,  and (b) to try out some new hand stitches. 


I started on this page first. I loved the partial circle motif embroidered on the ribbon which was crying out to be 'completed'. I fixed the sari scrap down with running stitch first and then filled in the missing part with back stitch. The other stitches I have used on this page are Chain stitch, buttonhole, Tulip stitch, Shisha and Sailors Edging.


Next I chose these sari strips with printed squares and went mad with the diagonals! I used Paris stitch, running stitch, back stitch, Closed Herringbone and Sorbello. The edging is done with Antwerp Edging. 

I can't believe how the tiny sequins on the sari ribbon are attached - they have individual strips of foil wrapped round them and bent over on the back, which must be done manually!


The third page was inspired by the flower like circles on the sari silk. I used pistol stitch, berry stitch, picot stitch an a scroll border.


The final page has Crown stitch, Woven Stars, Japanese Darning and Satin stitch circles. I used Zigzag Stitch for the border.


The cover had to be even more colourful! I chose a selection of shot silk taffeta sari ribbons in various colours and wove them in a rectangle to size. I ran a nearly invisible line of small running stitches around the edge to hold it all in place before adding the more decorative chain stitch border. Finally I finished some more woven crosses in the centre to give it more rigidity and decoration. 

The book is simply assembled using a running stitch in floss down the inside of 1 page and back up the side of the next page. The second set of pages were stitched in the same way and then a final press to finish it off.