Every year I like to make a foliage wreath for my front door, usually on the first weekend in December. I use foliage cut from my garden on a shop-bought base. Try to find a base that is thin twigs twisted together rather than the twisted willow kind as it will be easier to push the foliage straight in without having to use wire to hold it. This year I have made 2 wreaths - a large one for myself and a smaller one for a friend. The smaller one has foliage all the way around, which is how I usually make them. However, this year I decided to try something different for the larger one by having foliage only 3/4 around for a different effect.
First you have to cut some foliage. Although I have a large garden I don't grow anything specifically for wreath making - look for anything green and sturdy or dried. I always use pieces of conifer to cover the base but after that you can try anything. I think the key to making your wreath look interesting is different sizes and textures of leaves. I cut: - Conifer
- Lonicera Nitida (small leaved hedging plant)
- Rhododendron buds
- Camellia buds
- Broom
- Ivy and Ivy flower heads
- Viburnum
- Red dogwood stems
- Japanese anemone seed heads
- Oregano seed heads
- Montbretia seed heads
- Dried Lavender flower heads
Holly or anything with red berries would be ideal but I don't have that growing in my garden any more.
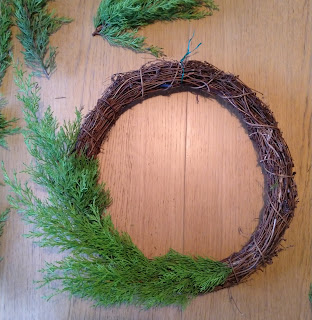
Start by covering the base with pieces of conifer - strip the bottom 5cm of stem of leaves and push it into the base, gently but firmly. Ensure the piece is pushed it at an angle which will allow it to lie flat on the wreath but follow the curve of the base.
You will see that I have also wrapped a piece of garden wire around the top of the wreath, which will be covered up later. This is to allow me to secure the finished wreath to a door hanger at the end.
This is the small base completely covered with conifer - note how all the pieces of conifer are pushed in the same direction.
Here is the larger base covered about half way round in the same way but with a small piece pushed in the opposite direction at the bottom. I have started to add some pieces of Broom too.
Next I've added some Ivy stems. If you can get a long piece I like to curl it around the inside of the wreath when I'm making a full one like the small base - just push it in firmly on the inside half-way up one side, curl it round and push the other end in where it finishes.
Then start adding some bigger leaves - here I like the buds of Camellias and Rhododendrons. Strip off the bottom few leaves to get a bare stem then push it in through the conifer. Around the outer edge I have added some Japanese Anemone seed heads and stems of the Lonicera, which all have completely different types of leaves. Notice how they are pushed in at an angle to keep the circular movement around the wreath.Here is the same stage on the larger base. I've focussed on adding smaller leaves or more dainty foliage to the part on the bottom right facing the other way as a contrast to the rest of the wreath.Fill out the wreath with pieces of any other foliage that you have. I have used Ivy flowers, Viburnum flowers and various other dried seed heads - some of which are from weeds! Just make sure to keep pushing them in at an angle to keep the circular movement around the wreath.Finally add some pops of colour - I have used red Dogwood stems to curve around the edge (they grow in this curved shape) plus some artificial red fabric flowers and artificial berries as I don't have anything red growing in my garden this year unfortunately.
Here is the completed larger base - this one has artificial white Christmas Roses (Hellebores) at the bottom to cover the join between the 2 sides of foliage.
And here it is on my front door! I was worried that the asymmetric design might mean it didn't hang properly but it seems ok. I have it hanging on a door hanger purchased from a pound shop - I dig the bottom hanging hook into the wreath base and then twist the wire around the back so that it can't be blown off in the wind. Once Christmas is over and you take down your wreath, gently pull out all the foliage and throw away (saving any artificial additions of course) and store the base in a dry place until next year - this is probably the eighth time I've used this base.
Apologies that most of these photos are taken in artificial light, which is not so clear as daylight. The short days in December mean this is inevitable.


